SteveKrieg
Company Commander
G'day all,
Been awhile since my last post and hope all is going fine with all on SAG?. Last post entry was regards the DML kit-form Pz 11C which I intend to turn into an F variant, however; I've decided to shelve that particular project pending arrival of an Field Of Armor (FOA) modification kit in order to make it so.
Meanwhile, I've unpacked another kit that I bought from FOA last year - their kit-form Flak 88/36 which I'm now committed to. I know 'Hammer's been working away on the same kit - to which I'll definitely be taking notes from his posts (remember 'Hammer' - plagiarism is the best form of flattery).
The plan is to turn it into a Luftwaffe-crewed gun of the Flak Abteilung 33 which Rommel employed in an anti-tank role becoming the most feared weapon in his arsenal. Used in tandem with purpose-built A/T guns, the '88 was employed to great success despite the fact there were few available (no more than 30-40 from what I've researched). The gun will have the trailers (bogies) placed aside with ammo and crew equipment placed around it...such is the plan.
For my two cents, anyone wishing to tackle this model better be prepared for some patience and time as it'll take a little of both to see it through.
- For starters ensure you have an appropriate amount of varying grade sandpaper, a small sander, a dust mask, superglue for the smaller bits and araldite for the larger (heavier) parts.
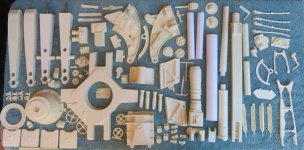
-There are quite a few parts both resin and metal and the gun shield is all metal.
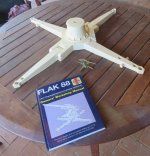
- The instructions can be downloaded from the website though there is a little interpretation required and I highly recommend also looking at the links FOA have put on their site (which goes to museum examples) and download the period user manual which is also on their site. Books on the gun will also assist.
- Read the instructions carefully prior to any assembly and follow FOA's golden rule of test fit before you glue.
- Wash the resin parts in a mild soapy wash, rinse and let dry as the first step.
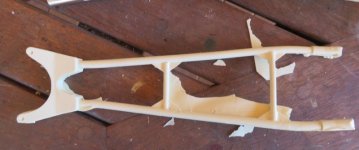
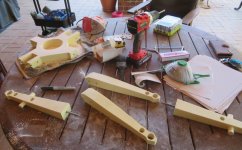
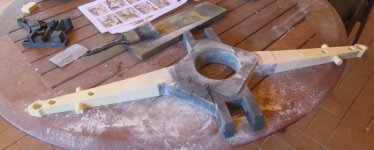
The cast resin parts have lots of flashing which needs to be removed prior to any further work and this is where you'll require the time. To-date I've only fitted and sanded the base (lower carriage) and used araldite given these are heavy parts. I've drilled out the outrigger holes so that the hinges fit allowing them to fold when fitted. I've sanded quite a few parts and given some the 'dunkelgelb' base coat and I do not intend to add the desert yellow coat 'til she's all done.
I've purchased the trailer kit which I should have soon though I suspect given the work involved that I may not have everything done for my intended DAK dioramas this year and it may push it out to next year which is just the way it has to be. Despite the work required, I'm enjoying the build process and highly recommend the FOA '88 kit for those interesting in tackling such a project. More posts to follow, enjoy, Steve.
Been awhile since my last post and hope all is going fine with all on SAG?. Last post entry was regards the DML kit-form Pz 11C which I intend to turn into an F variant, however; I've decided to shelve that particular project pending arrival of an Field Of Armor (FOA) modification kit in order to make it so.
Meanwhile, I've unpacked another kit that I bought from FOA last year - their kit-form Flak 88/36 which I'm now committed to. I know 'Hammer's been working away on the same kit - to which I'll definitely be taking notes from his posts (remember 'Hammer' - plagiarism is the best form of flattery).
The plan is to turn it into a Luftwaffe-crewed gun of the Flak Abteilung 33 which Rommel employed in an anti-tank role becoming the most feared weapon in his arsenal. Used in tandem with purpose-built A/T guns, the '88 was employed to great success despite the fact there were few available (no more than 30-40 from what I've researched). The gun will have the trailers (bogies) placed aside with ammo and crew equipment placed around it...such is the plan.
For my two cents, anyone wishing to tackle this model better be prepared for some patience and time as it'll take a little of both to see it through.
- For starters ensure you have an appropriate amount of varying grade sandpaper, a small sander, a dust mask, superglue for the smaller bits and araldite for the larger (heavier) parts.
-There are quite a few parts both resin and metal and the gun shield is all metal.
- The instructions can be downloaded from the website though there is a little interpretation required and I highly recommend also looking at the links FOA have put on their site (which goes to museum examples) and download the period user manual which is also on their site. Books on the gun will also assist.
- Read the instructions carefully prior to any assembly and follow FOA's golden rule of test fit before you glue.
- Wash the resin parts in a mild soapy wash, rinse and let dry as the first step.
The cast resin parts have lots of flashing which needs to be removed prior to any further work and this is where you'll require the time. To-date I've only fitted and sanded the base (lower carriage) and used araldite given these are heavy parts. I've drilled out the outrigger holes so that the hinges fit allowing them to fold when fitted. I've sanded quite a few parts and given some the 'dunkelgelb' base coat and I do not intend to add the desert yellow coat 'til she's all done.
I've purchased the trailer kit which I should have soon though I suspect given the work involved that I may not have everything done for my intended DAK dioramas this year and it may push it out to next year which is just the way it has to be. Despite the work required, I'm enjoying the build process and highly recommend the FOA '88 kit for those interesting in tackling such a project. More posts to follow, enjoy, Steve.