• Pardon the dust while the boys rebuild the site.

    The board will be in a state of disarray as I get things sorted out, for a little while at least.

    The new incarnation is using Xenforo as the system software. It is much like what we are used to, with a few differences. I will see about making a FAQ to help point out the differences for the members.


    One IMPORTANT difference for all of us old timers is that the 'mail' system is replaced with what are called 'conversations'/

    There is no 'Inbox' or 'Out box' or 'Sent' folders anymore.

    Think of Conversations as private 'threads' or topics that don't exist in a forum, that you start with another member. NOTE: Conversations can include more than one member if you or someone else in the conversaion, likes.
    Takes a little getting used to but I am sure you all can get a hang of it.


    Only a slightly modified default default Xenforo style is available for now. Once the new SAG style is ready it will be available.

    All existing users should be able to login with their usernames and passwords once the site goes up.


    If anyone has difficulties logging in please contact me at sixthvanguard@gmail.com.


    Thank you for your support and patience. I know it has been a loooong road.

Project - 'Fallschirmjager'

Oh, Squidley, for the grass mats - JG Miniatures produce the range in several styles ranging from grasslands, desert, snow and such (some with tracks) and are designed for a smaller scale (1/32nd King & Country, Peter Jenkins etc) but when brushed with a scalp comb (thus raising the grass) is perfect for 1/6th. They come in elongated lengths and unfortunately cost a bit (AUD is normally $95 per sheet) but as alluded make a damn fine base for the stuff I do. Hope this helps?. Cheers, Steve
 
wow, this new layout and software looks great and no doubt will take some getting used-to but all kudos to the moderators. Given we've been offline for several months I've got a few updates (with imagery) to add over the coming days ref my FJR series of dioramas. Suffice to say I'm down to my last four (yes the number envisaged just increased the further I read into their exploits and so I couldn't help myself damn it). More to follow...
 
Okay, first little vignette to kick this thread back off (as a test also) is of German Army paratroopers with the aim of the supporting text going into the forming of the 7.Flieger Division and how it was 'cobbled' together from a disparate mix of Wehrmacht units which, under Goering's influence, were placed under the auspices of the Luftwaffe on 1 July 1938 with the Heer's Fallschirm-Infanterie-Battalion being fully integrated by early 1939.

I wanted to illustrate the initial pattern helmet and smock which, like the origins of any specialist clothing and equipment, were found wanting and, as we've seen from my early war scenes, corrected in-time for war. Cheers, Steve
 

Attachments

  • IMG_0004 (4).JPG
    IMG_0004 (4).JPG
    302.2 KB · Views: 5
  • IMG_0010 (6).JPG
    IMG_0010 (6).JPG
    295.8 KB · Views: 5
G'day all,

I'll have to skip my Op "Weserubung" drop into Denmark scene (that of two paras exiting the door of Ju52) as they are currently elsewhere at this time (i'll slot that in at later date) and push straight onto another drop that commenced several hours later on the 9 April 1940 which also came under Op "Weserubung" and involved a three company drop into Norway capturing a vital airfield or two for ground unit airlanding follow-up. With the capture of Stavanger/Sola airfield and the capital Oslo it was hoped that the Norwegians would simply surrender - they did not and so another drop by a company of 1./FJR 1 was made in order to cut off Norwegian forces near Dombas on 14 May which demonstrated weakness in the still-evolving German airborne doctrine such as dispersion (which impacted on the forming of cohesive combat forces), jump altitude far too low due to pilot error and problems finding equipment containers; issues that would rear their ugly heads again over Crete a year later.

I mentioned in the previous thread of the initial pattern or 'Trial' 'M36' jump smock and, by 1940 the better though still somewhat restrictive 'M38' was in-service. Likewise the inaugural 'M36' trial helmet with its less than popular X-chinstrap was refined by the 'M38'. Like the previous vignette, not all my scenes will be expansive with some just consisting of one or two figures at best - just enough to at least provide the illustrative figure continuity in the supporting text narrative by way of uniform and equipment.

The figure here (like pretty much all of them an old DML release 'kit-bashed' for purpose), depicts an Oberjager (Corporal) equipped with an MP38 and utilising a set of captured skis in order to get out of the Dombas pocket alive (many of those not killed were eventually forced to surrender). His airborne attire far from sufficient in keeping out the cold and relying on only an issue 'Toque' and sweater. The early pattern knee protectors were worn under the trousers and are utilised here as gaiters over his jump boots. Enjoy, Steve
 

Attachments

  • IMG_0025 (2).JPG
    IMG_0025 (2).JPG
    280 KB · Views: 6
  • IMG_0024 (3).JPG
    IMG_0024 (3).JPG
    214.9 KB · Views: 6
Some great stuff! Love the para's! Some great books too!
Bob
Cheers very muchly Bob, loads more paras to follow over the next couple of days as I catch-up. Yes one of the issues I have annually when I get into putting together massed diorama series is the equal amount of reference work I collate in order to ensure accuracy. Phew, my bookshelves get just as cluttered as my garage. Steve
 
In the lead-up to a proposed airborne assault on Malta, stalwart FJR commander Bernhard Ramcke was in Italy instructing Italian paratroopers when he was ordered at short notice (subsequently after the Malta mission was scrapped) to command a brigade-sized unit of 5000 Fallschirmjager for dispatch to North Africa to assist in propping-up Rommel's Alamein line. Named after him, Ramcke's unit was spread predominantly at battalion-level amongst the Italian formations.

With Montgomery's offensive in late October 1942, the Axis line was soon shattered and all German/Italian units beat a hasty retreat. With inadequate transport (given the formation was flown-in) Ramcke's brigade was barely able to escape but many did so thanks to a daring capture of a British road supply column. By which time, after a series of rearguard actions, the force was down to 600 men.

The diorama makes use of a 21st Century German motorcycle and sidecar combo (one of its early releases and the first I seem to recall to release such a machine in the scale which is akin a Triumph more than the common BMW or Zundapp). Heavily weathered/detailed with the addition of DML's CHE Ramcke figure. Supporting the scene, a hastily-prepared machine gun emplacement sited back in order to provide sustained fire. It is also predominantly DML with a mix of DiD's latest MG34 kit accessory release.

The figures and all their wherewithal weathered accordingly and I guess that's been a highlight of mine as I've continued through this expansive series covering all fighting fronts the FJR had been placed. I've really enjoyed the boot wear process in-particular which is essentially dabbing the paint that best resembles the environment then dry-brushing 'flat black' in order to highlight areas of 'build-up' of dust/dirt/mud and such in the welts and crevices. Next stop...Tunesia. Enjoy, Steve
 

Attachments

  • IMG_0162 (2).JPG
    IMG_0162 (2).JPG
    221 KB · Views: 7
  • IMG_0165 (2).JPG
    IMG_0165 (2).JPG
    442.1 KB · Views: 6
  • IMG_0171 (1).JPG
    IMG_0171 (1).JPG
    560.2 KB · Views: 8
  • IMG_0168 (2).JPG
    IMG_0168 (2).JPG
    296.7 KB · Views: 7
  • IMG_0167 (2).JPG
    IMG_0167 (2).JPG
    445 KB · Views: 6
With the success of Monty's Alamein offensive and the Axis route that followed coupled with the landing of Western Allied troops in Morocco and Algeria in early November, the Duetsch-italienische Panzer-Armee found itself gradually hemmed into Tunesia and efforts were immediately by the the German High Command to reinforce there in order to maintain a presence in the region. The first units to arrive were elements of FJR5.

Initially stout in the defence, the paratroopers steadily ran low on supplies and manpower as the Allies drew nearer (complete with air superiority). Early success (including an encounter with the British 2nd Parachute Battalion - the first time German paratroopers had encountered Allied airborne forces) could not hide the fact that despite the Panzer-Armee's late arrival into Tunis (well, what remained of it) could do little to stem the inevitable as no more reinforcements were flown in the orders from Berlin were curt - "hold fast".

For the Germans in the shrinking Tunis pocket (which they were now referring to as "Tunisgrad" it was all over by mid may. Only a small number of FJR from both FJR 5 and the remnants of the Ramcke Brigade (incl. Ramcke himself) managed to get away before the trap closed. Here I've finally found a use for the DML CHE Donkey w/packsaddle accessory kit (something I've had on the shelf awaiting a use for several years) and was originally going to be used to cover the FJR's exploits in Italy; however, I've other plans for that theatre as you'll soon see. Bringing supplies to a forward position both the donkey handler and an MG42 gunner seeking water peer skywards - "Is it one of ours"?.

The panniers repainted and detailed (with the open pannier filled with supplies and the other just weighted to ensure balance). I've since replaced the helmet next to the MG42 with one painted with the regimental 'comet' emblem. Both DML 'Kit-bashed' figures wear the Luftwaffe Tropical uniform with Type 2 "bone sack" in both Luftwaffe splinter and plain. Enjoy, Steve
 

Attachments

  • IMG_0173 (1).JPG
    IMG_0173 (1).JPG
    413.3 KB · Views: 11
  • IMG_0196.JPG
    IMG_0196.JPG
    289.2 KB · Views: 12
  • IMG_0197.JPG
    IMG_0197.JPG
    432 KB · Views: 13
  • IMG_0193.JPG
    IMG_0193.JPG
    388.4 KB · Views: 12
Following a few months after their withdrawal from Tunesia, the 1st Fallschirmjager Division moved into Southern France in prep for the Wehrmacht's 'Plan B' of Italy should it fall. With the loss of its African empire, the Western Allies, now with the support of the non-Vichy French sought to push up through the Mediterranean in accordance with the British intent that by pushing up through Italy three aims could be achieved, 1. knock the weakest of the Axis powers out of the war, divert substantial German divisions away from the French coast to defend it and by pushing up through Italy - in Churchill's words the 'soft underbelly' - they could meet-up with the Red Army and push into Germany side-by-side.

The stepping stone of Sicily seemed to support the idea that Italy was easy pickings though that's not to say that there was not a measure of hard fighting to be had. The 3rd Regiment FJR 1 (consisting of some 1,200 paratroopers) jumped into the northeastern part of Sicily at Catanio to bolster the Axis forces against a relentless Allied advance. Eventually they became rearguard along with several Italian units as the bulk of the Axis successfully crossed the narrow straits of Messina and after 36 days of stalwart defence were evacuated themselves during 1/617 August.

The scene shows a quickly-established company command post during the fighting and provided me another opportunity to completely repaint/detail and deploy another drop container (this one marked to indicate that it contains signals equipment). The 2-part Tornister 'd2' ("Dora 2") proved a reliable tactical transceiver set for use at levels higher than platoon (normally company to battalion and battalion to regiment). I have used one of the DML variants (fm the 'Walter Schmidt' figure) which features the omni-directional dipole sections. Enjoy, Steve
 

Attachments

  • IMG_0008 (6).JPG
    IMG_0008 (6).JPG
    513.7 KB · Views: 4
  • IMG_0010.JPG
    IMG_0010.JPG
    286.1 KB · Views: 4
  • IMG_0007.JPG
    IMG_0007.JPG
    336.9 KB · Views: 4
On 12 September 1943 SS-Haupsturmfuhrer Otto Skorzeny, Germany's ace commando executed one of the greatest rescue missions of the war by releasing deposed Italian dictator Benito Mussolini from his mountain-top gaol with the aid of some Brandenburgers and fallschirmager; all of whom arrived steathly by a dozen DFS230 glider.

Wait, there's something wrong with this narrative, yes there was an Otto Skorzeny and yes he was there as per the last part of the sentence but he was far from the ace commando that Goebbel's propaganda machine and post-war reflection (from Otto himself) would have you believe.

Whilst the precise operational planning fell to Kurt Student and the assault force commander - Major Otto Mors, legend would have us believe that it was all down to Skorzeny. After all it was he who is prominent amongst the footage taken (a camera crew at his behest ensured that Mors force was reduced in number and even more-so once Skorzeny got his way (again) and asked that 17 of his own SS men accompanied him).

Skorzeny was indeed amongst the first to land against a stupefied guard detachment, he even left his MP40 as he jumped out of the glider, in a rush to ensure he was the first in which, had the guard been just a little more aggressive, could have cost him his life). It was actually the sight of the 'tooled-up' paratroopers exiting the gliders that provoked an immediately surrender by the hotel guards. Student's personal pilot gingerly landed his Storch to pick-up Mussolini and it was to be a hairy take-off down the short hastily-cleared strip of ground. Skorzeny made it even more hazardous by demanding he climb aboard and personally escort Mussolini to a nearby airfield (for the plane that would take him to Berlin), the Storch now grossly overweight but miraculously it just managed to gain altitude after it cleared the cliff face.

Skorzeny's influence at Party level aided him and his 'elite' detachment in being feted as heroes whilst Mors and his paratroopers faded into the background. Here I've chosen to go for a series of poses to display the varying uniforms worn (based off coloured period photos) and given DML and CHE have, years ago, released Skorzeny figures I could not help but put the man in the scene (the better-looking CHE version) if only to ensure that the supporting text reflects the truth rather than the legend. Enjoy, Steve
 

Attachments

  • IMG_0139 (3).JPG
    IMG_0139 (3).JPG
    168.1 KB · Views: 7
  • IMG_0140 (3).JPG
    IMG_0140 (3).JPG
    325.2 KB · Views: 7
Covering what is often regarded as their 'finest hour', the Fallschirmjager's 1st Division, now largely in-situ in defence of Italy itself against the Western Allied invasion of the mainland that commenced early Sep '43, was brought to the fore along the formidable "Gustav Line" (made even more formidable I guess by their involvement). The town of Cassino, the various key spot heights around it and, seemingly key to the German defence but actually was not initially a part, the monestary; were all crucial to the Allied 'Road to Rome' yet it took four major battles (all of which were very costly to the Allied advance) over a period of six months (Jan thru Jun '44) to advance thru the Liri Valley on which Cassino and its capture held the key.

The 1st Division (predominantly the 3rd and 4th Regiments) were fed into the defence relieving-in-place Army (Heer) units. By the time of the 3rd Battle (the previous two by the French and American efforts having failed) it was largely up to the New Zealanders to put into effect their own plan on 19 Feb by which time the German paratroopers were firmly ensconced. General Freyburg (the man who commanded the allies on Crete so dismally) should've known better the calibre of the enemy in-front of him yet he sought to even the odds by a pre-assault bombing which only aided the defenders - the rubble making now impassable terrain (not to mention the remnants of the thick-walled buildings of the town and monastery) for his own advancing Kiwis.

It took a fourth battle plus a huge allocation of reinforcements for the Allies to finally take Cassino yet the retreating Germans were able to fall back to interior line of defence given U.S. General Mark Clark sought to capture Rome and make the history books rather than bottle-up significant enemy forces - forces that would only hold-up even further Allied efforts in Italy. But enough of the strategic failings of the Italian Campaign and back into the business of figures.

Against the rubble backdrop (more of which will be used come the day of the model show) I've several figures depicting the varied uniforms worn and weapons employed in the FJR's dogged defence (many interpreted thru period imagery) - snipers, flamethrowers, mortars and the effectiveness of the FG42 were all brought to bear. I was going to put in an MG42 team also but several such weapons already feature in the varied scenes (besides which I'm down to my last few uniforms, figures and gear for this year's theme - holding back some for the 2024 series covering D-Day).

Thus marks the last of my Mediterranean narrative...next lot covers the FJR's equally dogged defence of Normandy. Enjoy, Steve
 

Attachments

  • IMG_0366.JPG
    IMG_0366.JPG
    270.4 KB · Views: 4
  • IMG_0367.JPG
    IMG_0367.JPG
    281.4 KB · Views: 4
  • IMG_0004 (8).JPG
    IMG_0004 (8).JPG
    180.9 KB · Views: 4
  • IMG_0006 (6).JPG
    IMG_0006 (6).JPG
    267.7 KB · Views: 4
  • IMG_0008 (7).JPG
    IMG_0008 (7).JPG
    404.9 KB · Views: 4
  • IMG_0005 (5).JPG
    IMG_0005 (5).JPG
    262 KB · Views: 4
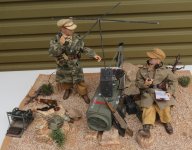
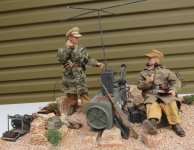
By the time of the great Western Allied crusade to re-enter Europe through the Calvados Coast (specifically Normandy), the Fallschirmjager had grown substantially despite their use in more a ground role than that of airborne and surprisingly, though a part of the Luftwaffe, were some of the best ground troops to be employed deep along the Normandy coast (including the Contentin Peninsula) as a strategic reserve and specifically trained in the most part to counter the likelihood of airborne insertion by the Allies.

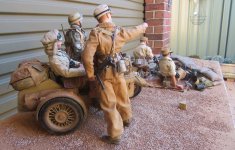
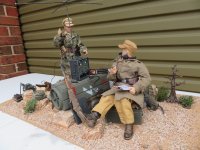
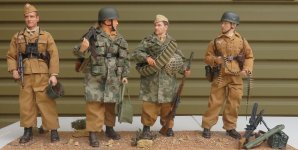
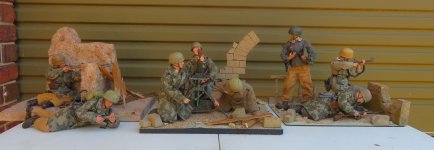
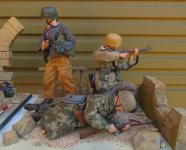
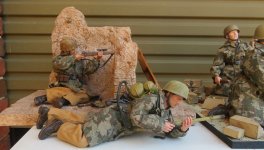
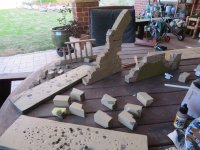
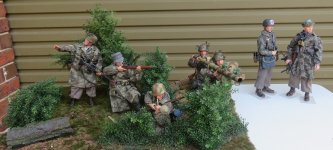
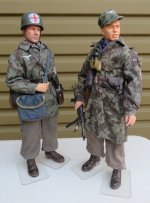
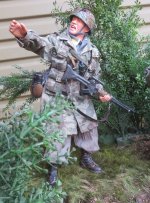
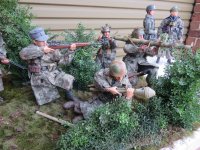
II Parachute Corps (consisting of 2nd, 3rd, 5th and 6th Parachute Divisions, and 6th Parachute Regiment) played a pivotal role in Normandy between D-Day and the end of August 1944 and in order to cover it sufficiently by way of 1/6th have split the figure narrative into three dioramas - Carantan, the Defence of Brest and one covering the fighting in-general in the Bocage (more so on the latter to cover uniforms and equipment).

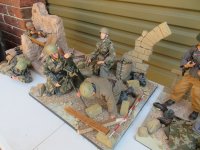
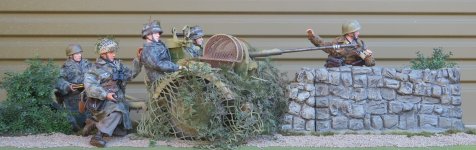
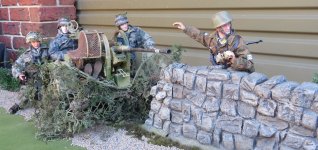
Firstly Carantan and for those fans of WW2 airborne then the clash between 6th Parachute Regiment and the U.S. 101st A/B Div will be familiar story. The German defence stubbornly blocking the link-up between the two U.S. beachheads as well as stall any chance for U.S. First Army to cut across the Contentin.

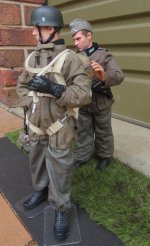
The battle to evict the Germans from St-Come-du-Mont preceded Carantan (the 6th FJR Regiment falling back over the Couve River into Carantan after munitions shortages and fear of being encircled left them little option. The German paras were actually ill-prepared to hold onto the town for any significant period despite Rommel's views that the town must be held for the reasons stated; however, Major von Der Heyte - the Regimental commander - carried out his orders and prepared the town for defence despite on-going ammunition shortfalls.

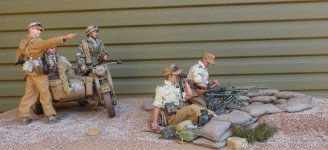
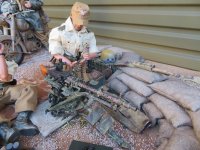
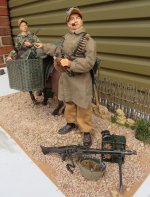
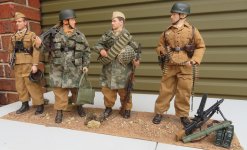
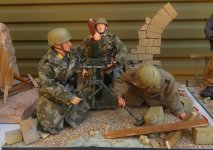
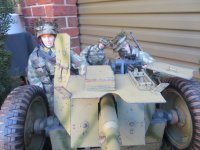
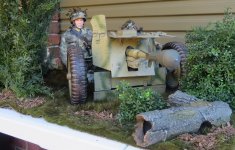
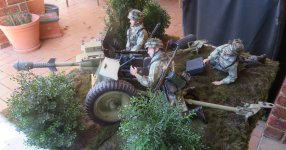
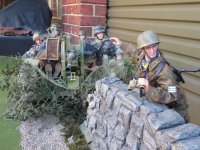
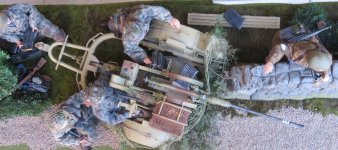
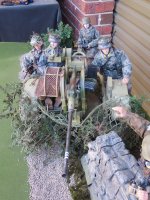
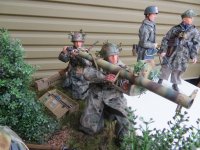
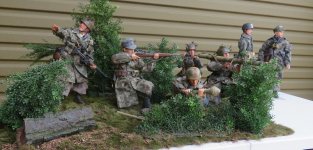
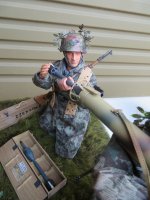
For the scene, illustrating the defence, I chose for inspiration a scene from the 'Carantan' episode of 'Band of Brothers' where a PAK 36 fires its muzzle-loaded Stielgranate 41 hollow-charge anti-armour grenade. By repainting and detailing my CHE variant of the gun a couple of years back, one of the problems with the model grenade was that it fitted entirely to the front of the barrel, held in-place by a protrusion at the back of it. I had a mate 3d print a more accurate round where the tail assembly of the grenade fits over the barrel sleeve - not to the front of it.

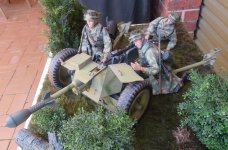
Here the crew wait in ambush noting that though the round was very effective it was only so at a maximum range of 800m and this was part of the reason why the now-obsolete PAK 36 was retained by the FJR - not only because of its air-drop capability but it was light enough to be man-handled around the battlefield and particularly the Normandy Bocage with relative ease by its crew, the design of the grenade done so in order to keep the gun in-service given the large number made. I also had the rounds transport container and a spare round 3d printed for added detail. Enjoy, Steve
 

Attachments

  • IMG_0196 (2).JPG
    IMG_0196 (2).JPG
    420 KB · Views: 9
  • IMG_0197 (2).JPG
    IMG_0197 (2).JPG
    339.3 KB · Views: 9
  • IMG_0201.JPG
    IMG_0201.JPG
    272.3 KB · Views: 9
  • IMG_0198 (2).JPG
    IMG_0198 (2).JPG
    316.9 KB · Views: 9
Correction my last...the PAK 36 used is actually a kit-form DML model which I used in-place of the CHE version given the kit-form allows movement of the top gun shields which I think really adds to this particular scene (better observation by the crew). The CHE version still on the shelf.
 
Cheers muchly Squidley, funnily the shrubs are just fish tank accessories courtesy of local pet stores, I brought heaps a few years back and washed in warm detergent, let dry then spray-painted in shades of Humbrol 'Grass green' and Tamiya 'Olive Drab 2' whilst some applied 'Flat Earth' colouring. The logs are the same - fish tank supplies. Dried mulch lightly sprinkled around it gives a bit of added detail. Showing their age though (aren't we all) and they are starting to chip in places so probably a big repaint due...next year as part of the 'D-Day' series build. Surprisingly despite their reason for being they make good terrain backdrop to 1/6th. Thanks again, Steve
 
The next Normandy-related scene covers the defence of the Brest by Ramcke's 2nd Parachute Division between 7 thru 19 August '44 which followed hot on the heels of U.S. VIII Corps breakout during Op 'COBRA' (the breakout of the Normandy bridgehead). The Brittany ports were vital to the supply flow of the Allies, particularly the U.S. forces following the weather destruction of their Mulberry Harbour and to hasten their eventual drive up to Paris.

As with any defence by German forces during the War those guarded by the FJR were always tough nuts to crack and despite being cut-off from their supplies held firm in-place (within the realms of airborne doctrine the world over which left no doubt of the fact that as paratroopers you are surrounded upon landing). Against a relentless (and costly) American attempt to capture the city, Ramcke begrudgingly surrendered on the 19th August; however by this stage, the City had been raised to the ground and its key objective - the port itself - made useless.

Despite the shortcomings of the Brittany battles (largely that of not being able to take a useable port, well, they were made usable eventually), the capture of the peninsula allow the U.S. the space to deploy properly for follow-on operations which led to an earlier-than-expected capture of Paris.

Anyway, back to the FJR, here paras man a FLAK 38 in the outer 'burbs of Brest. Mounted on its trailer gives the opportunity to move the gun (considered somewhat obsolete as an air defence weapon by this time of the war but still a very fearsome piece of ordnance against ground targets) off the road into a camouflage hide and then bring to bear as required, it's crew commander keeping an eye down the road for targets of opportunity. Mostly made of up of DML with the gun/trailer a CHE exclusive (I recall), completely repainted and detailed. Enjoy, Steve
 

Attachments

  • IMG_0093 (3).JPG
    IMG_0093 (3).JPG
    236.9 KB · Views: 4
  • IMG_0098 (2).JPG
    IMG_0098 (2).JPG
    571.9 KB · Views: 4
  • IMG_0102.JPG
    IMG_0102.JPG
    365.1 KB · Views: 4
  • IMG_0101 (2).JPG
    IMG_0101 (2).JPG
    449.6 KB · Views: 4
  • IMG_0094 (3).JPG
    IMG_0094 (3).JPG
    383.3 KB · Views: 4
  • IMG_0103.JPG
    IMG_0103.JPG
    683.4 KB · Views: 4
The last of the Normandy-themed scenes is more a compilation of the types of uniforms, equipment and weaponry employed by the FJR during the campaign. The FJR, as with many German units, made the most of the defensive nature of the Bocage and a great cost to the Allies who, despite the pre-invasion intel, were initially taken-aback in how to exactly fight successfully in such terrain. Enjoy, Steve
 

Attachments

  • IMG_0040.JPG
    IMG_0040.JPG
    246.5 KB · Views: 7
  • IMG_0042 (2).JPG
    IMG_0042 (2).JPG
    226.7 KB · Views: 7
  • IMG_0044.JPG
    IMG_0044.JPG
    339.6 KB · Views: 7
  • IMG_0046.JPG
    IMG_0046.JPG
    531.2 KB · Views: 7
  • IMG_0051 (1).JPG
    IMG_0051 (1).JPG
    286.5 KB · Views: 7
  • IMG_0047 (4).JPG
    IMG_0047 (4).JPG
    392 KB · Views: 7
  • IMG_0043.JPG
    IMG_0043.JPG
    719.5 KB · Views: 7
Back
Top