• Pardon the dust while the boys rebuild the site.

    The board will be in a state of disarray as I get things sorted out, for a little while at least.

    The new incarnation is using Xenforo as the system software. It is much like what we are used to, with a few differences. I will see about making a FAQ to help point out the differences for the members.


    One IMPORTANT difference for all of us old timers is that the 'mail' system is replaced with what are called 'conversations'/

    There is no 'Inbox' or 'Out box' or 'Sent' folders anymore.

    Think of Conversations as private 'threads' or topics that don't exist in a forum, that you start with another member. NOTE: Conversations can include more than one member if you or someone else in the conversaion, likes.
    Takes a little getting used to but I am sure you all can get a hang of it.


    Only a slightly modified default default Xenforo style is available for now. Once the new SAG style is ready it will be available.

    All existing users should be able to login with their usernames and passwords once the site goes up.


    If anyone has difficulties logging in please contact me at sixthvanguard@gmail.com.


    Thank you for your support and patience. I know it has been a loooong road.

Sherman (Dragon) M4A3

tankfan0720

Tanker
Hello all, I enjoy this site and all the fantastic projects. I wanted to post some pix of my latest project. The Dragon M4A3. This is a fun kit. It has a lot of things not quite correct, but being plastic it is easy to modify and has really endless potential for detailing and improvement. I wanted to improve the detail but not make a museum quality model. It is not quite finished but hope to this summer. Photos are not in any particular build order. More to follow. Hope you enjoy...
Thanks for looking...Bob

Functional spring antenna:


Front wood storage rack:


Track pad wear:


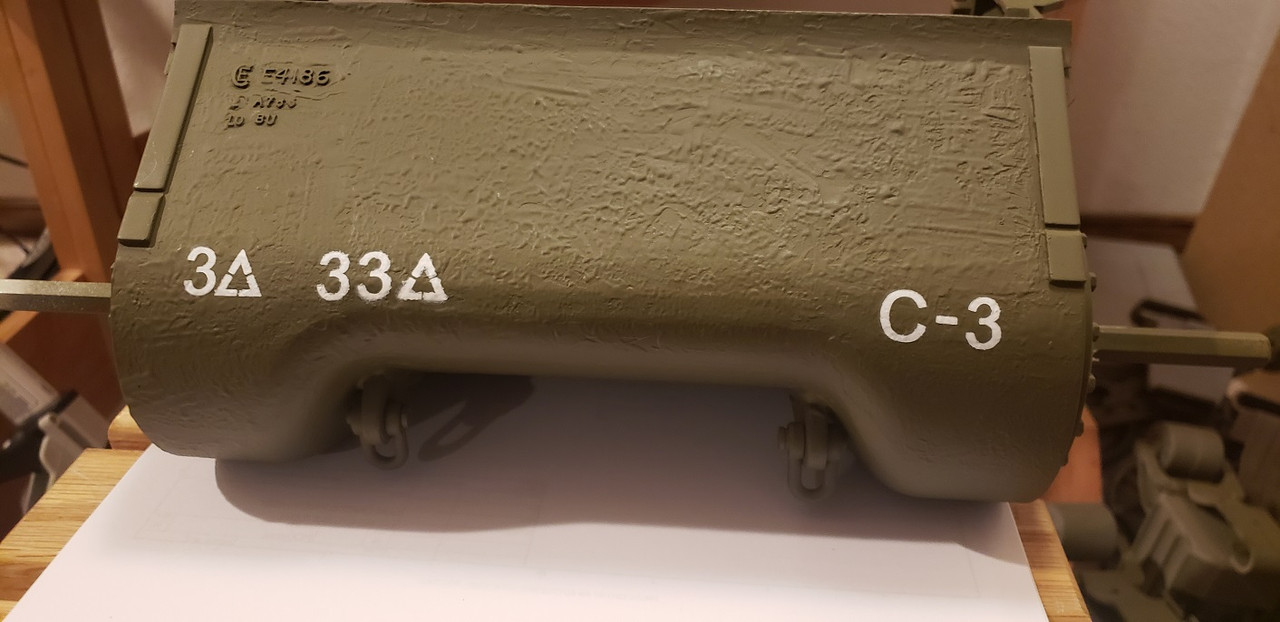
Rotor shield cast marks:


Idler axles (aluminum):


Exterior rotor shield cast marks:


Idler bearing assembly:


Idler tension shaft:


Front sprocket shaft (Al) and ball bearing:


Hull cast marks:


Drivers and hull MG gunner hatch details, periscope, guard etc:


Modified function suspension arm, with ECA wheel:


General steel castings foundry mark:


Commanders hatch detail, periscope:


Brass lamp guards:


Suspension Bogey with ECA wheel inserts:


Fully functional suspension bogeys:


Loaders hatch inside detail:


Left lamp and siren guards (brass):


Hull Mg and right lamp guard:


Tools, painted:


Rear engine deck:


Faux idler support bracket:


Sprocket fill (rear sprocket - milliput):


Suspension springs:


Tools, before painting:


Engine bay doors:


Brass periscope guards:
 
Last edited:
Good work on all of the upgrades that you have done. Look forward to seeing this big beast when it is completed. The Dragon Sherman is such a wonderful kit, it's a damn shame that they aren't doing more vehicles. Keep posting those photos.

Jeff (Geppetto):!:
 
WOW - this will be a nice build. I may still get a Sherman but I will have to do some massive research on now they are built. Your detailing on the tanks tracks look good, I especially like the wear and batted look to the rubber treads. I will keep an eye on your build The fun part will be adding the massive welds around the hull and turret parts.

Cheers
 
Nice work indeed.
Keep after that bad boy.:rock:
John makes the searchlight deal, and what spring did you use on the wheels if I might ask?

Jeff
 
Thanks for all the nice comments guys. I'm hoping to have some finished pix soon.


Jeff the suspension spring is McMaster Carr part 9657K121. Its 1/2" OD x 2.00 long x .047" wire dia, About $5 for a pack of 12. Spring rate is about 6.3lbs. Two required per bogey.


Bob
 
Thanks for all the nice comments guys. I'm hoping to have some finished pix soon.


Jeff the suspension spring is McMaster Carr part 9657K121. Its 1/2" OD x 2.00 long x .047" wire dia, About $5 for a pack of 12. Spring rate is about 6.3lbs. Two required per bogey.


Bob

Thank you Bob , put away in favorites, when I get to that thing.

Jeff
 
Hi SAG fellows,
Thanks for all the nice comments. Here are some more pix of added details. This project is finally nearing completion. Hope to get some outside shots soon.

Head lamp lenses added:


Commanders vane sight from brass:


Commanders periscope gaurd and MG barrel support in brass:


Turret Hatch details after initial Olive Drab paint:


Turret rear details after paint:


Turret front details:


Overall view:
 
Last edited:
Hello All, Hope everyone had a great Labor Day weekend. I got a little weathering done on the Dragon Sherman and it looks better - toned down the "show room fresh". Got some out door shots since the weather was nice. Hope you enjoy - even though it is another...<ho-hum>...Sherman! The ECA wheel inserts and bogey wheels are a great addition to this kit. Still more to do...stay tuned....


This last one shows the functional suspension working. The stump is 3" high.

 
With the re-issue of the DML kit I thought I would post some images of my "finished" M4A3 75mm. I just recently added the S/N, engine deck star, and bumper code numbers. This unit fought in Normandy with 3rd Armd Div.

Also posting some older images because "Foto-bucket" puked on posting them.

This is a fun kit, the track links are the weakest link. They can be modified easily (with a lot of work) to be much more robust. Perhaps I will post some images of that later....:D

I hope we'll see some more build threads of this kit in the future.

Bumper codes and vehicle S/N:


Finished pictures from 2015:


Fully articulated suspension:
 
Last edited:
Hi all,
Been a while with no update. I've decided to RC this model using the new Spyker upgrade parts. So here goes.


Already modified the suspension with Ryans excellent kit. Will post some photos later of that.


New front tranny housing using Spyker parts. The "texture" is simply epoxy, smoothed with a piece of credit card to add texture. The black was a test of a different type of epoxy.


Casting marks using plastic letters:


After painting & adding ID numbers:


Casting numbers painted:


Inside of tranny, showing Spyker bellt transmission. The front tranny will not be glued but bolted using small screw and washer just like the real tank.


Drilling out the end connectors. The fixtures included with the kit are excellent and work well.


Lastly assembling the tracks. The delrin links are super strong - way better than stock tracks. The track fit is perfect on the sprocket but it will not fit on the stock sprocket without the modification parts.


I have the hull finished. Will hopefully have it running soon. Lots of track links to assemble first!
Till nexc time....
B
 
Hi SAG,
Thanks for looking in Atilla and Fred! The epoxy texture was amazingly simple to do.


Posting a quick update while in the middle of the mundane track assembly work. One downside of the Dragon sprocket are that the teeth on the back side are hollow. I machined a filler piece from styrene using the CNC.

Filler pieces fresh off machine:


Fitted to Sprocket for fit check:


Did a painting and weathering test on a small section of the Spyker track. I think it came out pretty good. I'm using black RTV the "glue" the two track pad halves together to keep out water. Probably overkill. :@


Thanks for looking. Till next time..

Sure would be nice if we had that go to end of thread feature back...
B
 
Last edited:
WOW! You're doing an EXCELLENT job detailing and installing the rc upgrades!

I REALLY LIKE the brass commander's sight vane and folding MG bracket! Where can I get some of those for my Sherman?

Mike in Kentucky
 
Back
Top